Self-Service Active Directory User Provisioning Using System Center Orchestrator and SharePoint
Automates Active Directory user account provisioning via a simple self-service form that triggers an account creation workflow.
Solution Guide
What It Does
This example solution automates Active Directory user account provisioning / user onboarding by providing a self-service interface to end users that triggers a series of workflows to create and configure a new account. The automated process performs the following tasks:
- Monitors a Microsoft SharePoint list for new items representing submitted requests to onboard a new employee
- Reads the data from the SharePoint request
- Generate a temporary random password
- Generate a unique username according to a customizable standard format
- Creates an Active Directory user account
- Enables account
- Determines correct organizational unit container for user based on request
- Determines correct group membership for user based on request
- Adds user account to necessary groups
- Determines correct manager for user and assigns the manager to the user account
- Generates a text file with the user’s credentials for initial login
- Attaches the credentials file as an attachment to the SharePoint request
- Updates the request status to provide visibility to the end user
This example is not exhaustive, since most environments have more complex user provisioning needs, including providing the user with email accounts, additional application access, physical items like a desk and phones, etc. This additional functionality could be added incrementally to the starting point provided here.
Usage Scenario
This solution addresses the common scenario of user onboarding that involves setting up a new employee with accounts and access to systems used by the organization. Often this is a manual process that involves a request from human resources or another group to IT, who performs the setup and then notifies the requestor when finished.
There are several problems with this type of process, including:
- Time taken from request submission to work starting to work finishing
- Errors arising from data being entered or interpreted by several different people
- Administration overhead for IT to complete the requests
By providing a self-service, automated request process, IT is relieved from performing the associated manual tasks, and the provisioning can be completed within minutes versus hours or days. Moreover, the results will be more consistent because opportunity for data entry error is minimized.
How it Works
(For a full walkthrough of the runbooks, see the included video.)
Architecturally, there are three primary components involved:
- Microsoft SharePoint
- Microsoft System Center Orchestrator
- Active Directory
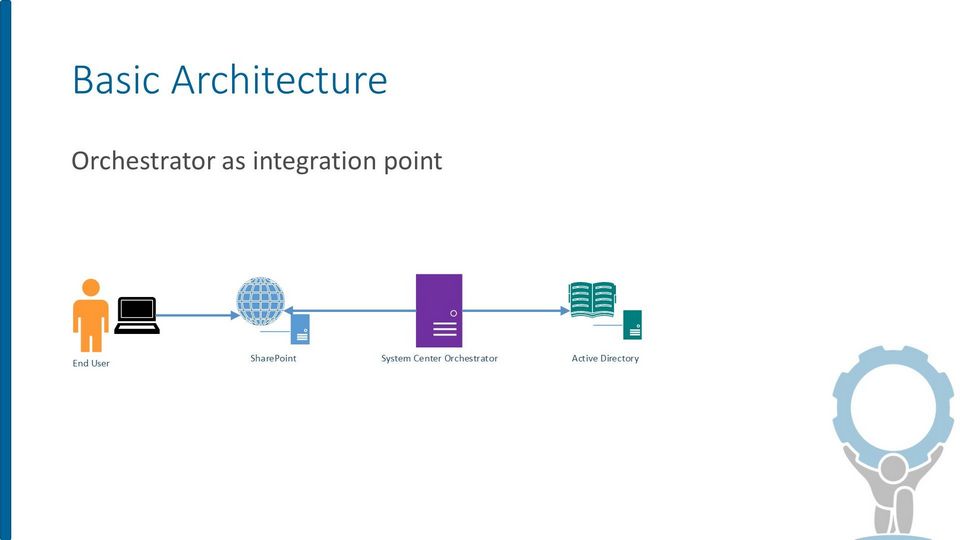
SharePoint
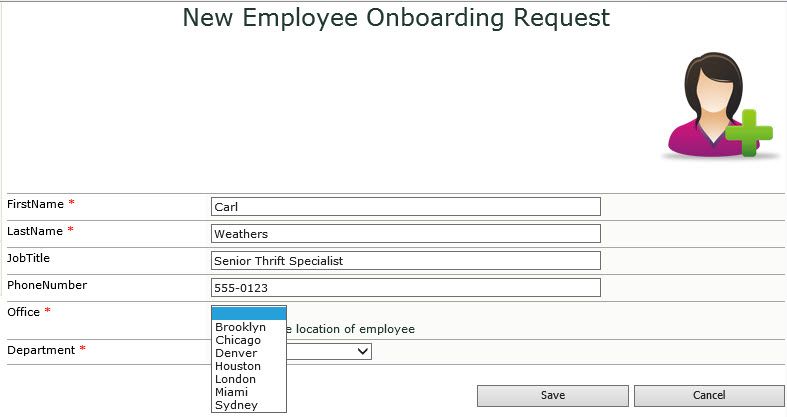
SharePoint serves as the user interface or front end to provide a way to submit requests and view request status. The example was created using SharePoint 2010 Foundation, and doesn’t require any special functionality beyond a normal SharePoint list.
A request in this example is a SharePoint list item created by a user. The request has several fields (columns) that are read by the runbooks to perform the provisioning:
- First Name
- Last Name
- Job Title
- Phone Number
- Office
- Department
There is also a “Status” field that is used to show the user which state the request is in, and also to indicate to Orchestrator which requests are new and which have already been serviced. SharePoint doesn’t perform any provisioning work. It only stores requests.
System Center Orchestrator
Orchestrator serves as the automated workflow engine in the solution. It performs all the provisioning tasks using several runbooks (details of each are included below). Orchestrator acts on behalf of the requestor, in that it watches for new requests to appear and then invokes runbooks to do the work. Note that the runbooks run in the context of the Orchestrator service account, and not as the requesting user. Therefore, there is no need for the end user to have Active Directory privileges.
Orchestrator runs the monitoring runbook in the solution continuously. Only when it finds a new request are the other runbooks invoked.
Because it performs actions against both SharePoint and Active Directory, Orchestrator must be configured to be able to locate and access both. This is done via the configurations in the Options menu of Runbook Designer.
Active Directory
There is nothing special about Active Directory for purposes of this example. Active Directory plays a passive role, with Orchestrator performing actions against it, like creating or modifying objects. As long as a domain controller is reachable by Orchestrator using standard Active Directory protocols, there should be no configuration required.
Note that the example assumes a particular directory structure. For example, it expects office and department groups to match the request options. These details would need to be tweaked for the runbooks to perform the equivalent in your environment.
Implementing In Your Environment
This section describes how to get the example up and running in your environment. As always, it’s best to have a separate development environment to try things out on before messing with your production systems.
For a full implementation walkthrough, make sure to check out the included video.
Prerequisites
We’ll assume the following is in place before getting started:
- System Center Orchestrator 2012 R2
- System Center Integration Pack for SharePoint 7.2.117.0
- System Center Integration Pack for Active Directory 7.2.43.0
- Latest integration packs can be downloaded here
- Microsoft SharePoint 2010 or higher
- A site with a list for testing has been created
- Orchestrator service account granted at least Contribute permission on site/list
- Active Directory domain available and reachable from the runbook server
- Orchestrator service account granted permission to create user accounts and modify groups
- Tested against 2012 R2 domain level, but should work fine with older versions
- Downloaded solution files for this example from Automys.com
Importing the Runbooks
Note: you may want to back up your Orchestrator database before making changes (in addition to your normal scheduled backups). That makes it easy to roll back any changes.
Use the standard import functionality in Runbook Designer:
- Select a folder where you want the imported folder to go
- Right-click and choose Import
- Browse to the “<filename>.ois_export” file extracted from the downloaded zip file
- Click Finish (leave default options selected)
Once the import process finishes, you should see the following in Runbook Designer:
- Runbooks folder “User Account Provisioning” with the example runbooks
- Variables folder “User Account Provisioning” in Global Settings > Variables > Automys Library with several variables.
- Placeholder configuration under Options menu
- Active Directory: “Automys Testing Configuration – Active Directory”
- Microsoft SharePoint: “Automys Testing Configuration – SharePoint”
If you see runbook activities with a question mark icon, this means the required integration packs weren’t installed prior to import. You’ll want to delete what you imported or roll back the database, then install the integration packs before importing again.
Configuring the Variables
Update the values for the imported variables to match your environment. Each variable has a description about what value is needed. Simply open the variable and replace the value.
Configuring the Integrations
Configure the imported integrations for Microsoft SharePoint and Active Directory. This is done via the associated entry under the Options menu in Runbook Designer.
Active Directory configuration
Update the entry “Automys Testing Configuration – Active Directory” to reflect your environment.
|
Property |
Value |
|
Configuration User Name |
Used to connect to domain controller. Recommend using the Orchestrator service account, e.g. DOMAIN\Username. |
|
Configuration Password |
Password for account |
|
Configuration Domain Controller Name (FQDN) |
Use simply the domain name unless not all domain controllers are reachable on the network, which would be bad |
|
Configuration Default Parent Container |
The base OU where searching should start. Can simply be DC=<yourdomain>,DC=<com> if you don’t have a more specific part of the directory where users and groups are located |
SharePoint configuration
Update the entry “Automys Testing Configuration – SharePoint” to reflect your environment.
|
Property |
Value |
|
SharePoint Site |
The base URL of the SharePoint site hosting the new user request list |
|
User Name |
Username to connect to SharePoint which has access to modify list |
|
Domain |
NetBIOS domain name, e.g. CONTOSO |
|
Password |
Password for account |
|
SharePoint Online |
False unless you’re connecting to SharePoint Online |
|
Default Monitor Interval (seconds) |
Optionally change from default if desired |
|
Default Maximum Items |
Optionally change from default if desired |
Configuring the SharePoint List
Orchestrator will expect to connect to a SharePoint list to look for new request items. You can create a list from scratch with the relevant columns, or you can use the included “.stp” file to import the example list template and create a new list from the template.
Ensure the account configured for the SharePoint integration in Orchestrator has at least Contribute permission to the site and list.
Creating List from Template
Follow these steps to use the template file to create the list. Tested on SharePoint 2010.
- Open Site Actions > Site Settings.
- Select List templates under the Galleries section.
- Ensure the Documents tab of the Library Tools ribbon is visible.
- Click Upload Document, and upload the .stp file included in the downloaded example files.
- Once saved, open the All Site Content view.
- Click Create, and select the User Onboarding Request List template.
- Give the new list a name (the example runbooks expect “User Onboarding Requests”). Click Create.
- The list is created. Verify a new item can be created and saved.
- Modify the columns and choices as needed.
Creating List Manually
If you prefer to configure the list yourself, created a new list with the following columns:
|
Column |
Type |
|
Department |
Choice (Add your test department names) |
|
FirstName |
Single line of text |
|
JobTitle |
Single line of text |
|
Office |
Choice (Add your test office names) |
|
PhoneNumber |
Single line of text |
|
Status |
Choice (New, In Progress, Complete, Error) |
|
Title |
Single line of text |
Kicking the Tires
At this point, the solution should be ready to test out. All we need to do is start the “Monitor User Onboarding Requests” runbook, which will watch for new requests. Then, create a new item in the request list.
When the monitor next checks the list, the status should be updated and the provisioning should begin. Watch the runbook logs to see if any errors or warnings are reported.
Refresh the list to check for the request status to update to “In Progress”, then with any luck, “Complete”. Check the item for an attached credentials file, and check Active Directory to verify everything is correct with the created account. If everything worked, crack open a beer.