Dynamic Application Deployment - Configuration Manager, MDT, Orchestrator
Quickly deploy an OS and dynamic list of applications to a device from a SharePoint request with MDT, Configuration Manager 2012, and System Center Orchestrator.
Solution Guide
What It Does
This example solution simplifies the installation of a custom list of applications onto a new computer during the imaging process. It provides an automated way to dynamically deploy applications during a System Center Configuration Manager 2012 OS deployment task sequence, with the list of applications being fed from a simple SharePoint list item. This approach allows a new PC deployment to be defined in SharePoint, including a list of software to be installed.
During deployment, the technician performing the build need only enter the request ID and (optional) username, which is passed to a System Center Orchestrator runbook that coordinates the creation of a record in the Microsoft Deployment Toolkit 2013 (MDT 2013) database. This record is then used by a native MDT task sequence to perform OS imaging and dynamic application installation.
The list of applications that can be selected in a request comes straight from Configuration Manager 2012, courtesy of an Orchestrator runbook that syncs Applications to a corresponding SharePoint list.

Why Do This?
There are several good things about an integration like this:
-
Allows each computer to have a custom application set installed: When a one-size-fits-all image is too bloated or causes over-licensing problems, custom-built machines can save time and money.
-
Eliminates manual input during imaging: While there are methods available to select a list of applications within a task sequence, this is tedious and hard to maintain. The imaging process should be simple and efficient, with as close to zero-touch interaction as possible.
-
Separates the deployment definition from the imaging process: For larger organizations, the best person to decide what should go on a given device isn’t the technician performing the imaging itself. This allows the right person (even without access to or understanding of Configuration Manager) to configure the deployment with a list of software using a simple web form, and the technician to focus on delivering the built machine with minimal chance of error or miscommunication.
-
Extensible: Because Orchestrator is integrated in the process, additional automation can be performed in conjunction with the deployment, like recording imaging results in external systems or sending a text message notification when imaging completes or fails. Although the example performs only application installation, it could also easily be modified to handle package deployment.
How It Works
This example is an integration of:
-
System Center Configuration Manager 2012: Provides the operating system deployment (OSD) functionality, including application management and task sequence execution on client device.
-
Microsoft Deployment Toolkit (MDT) 2013: Provides a database and web service that augments the deployment process by providing extra functionality in the task sequence. In particular, we’re leveraging its ability to facilitate dynamic application installation and to invoke Orchestrator runbooks from the client. Read more about the integration of MDT and Configuration Manager.
-
UI++ by ConfigMgrFTW!: Used to a present a simple and clean user interface in the task sequence that is highly customizable.
-
Microsoft SharePoint: Provides the user interface to create and submit deployment requests that include a list of applications to install. The request contains additional fields to store deployment result information. A second list contains the applications that are available for selection.
-
System Center Orchestrator 2012: Serves as the integration point between Configuration Manager, MDT, the task sequence client, and SharePoint.
There are enough moving parts here to be confusing. It may help to think of all this as doing a couple main things: first, we get a web request form for device deployment; second, it enables a task sequence client to receive applications dynamically without knowing anything about them.
Also, a picture might help:
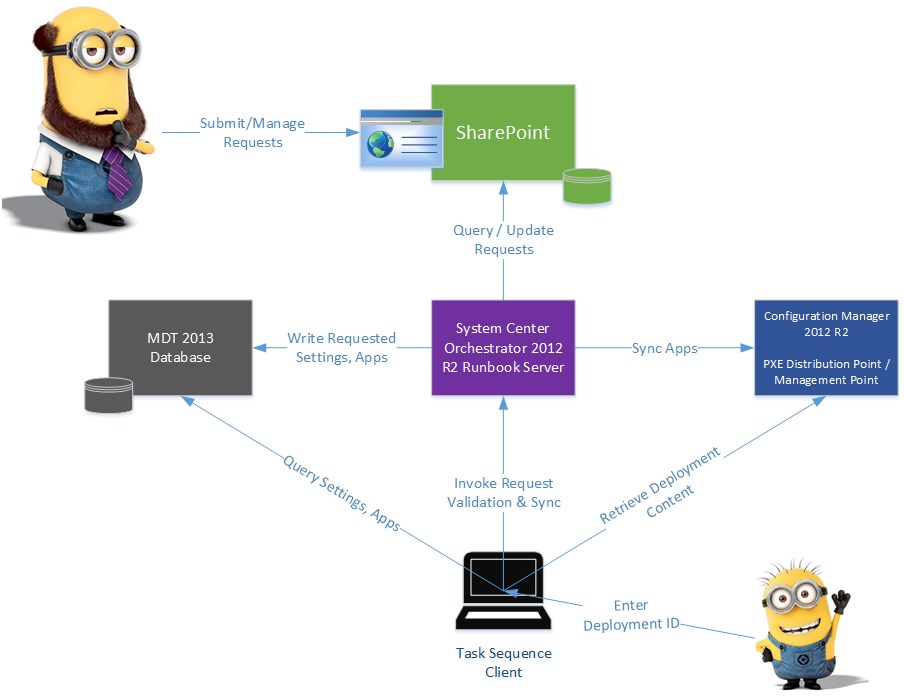
SharePoint Software List
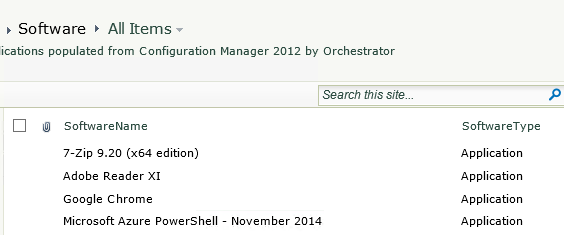
The first list in SharePoint is a simple list of applications that can be included in a deployment request. This list comes from Configuration Manager’s defined applications, which are populated into the SharePoint list by the Orchestrator runbook “Sync Application List”.
Device Deployment Request List
The second list in SharePoint holds deployment requests. In our example, a request only contains a list of applications to install, selected from the items in the Software list. It has additional fields for other information including computer name, status, and inventory data, all of which is populated by Orchestrator during deployment.
When a new request is created, it is assigned an ID number automatically by SharePoint. This becomes the Deployment ID that is referenced during the deployment process.
Microsoft Deployment Toolkit
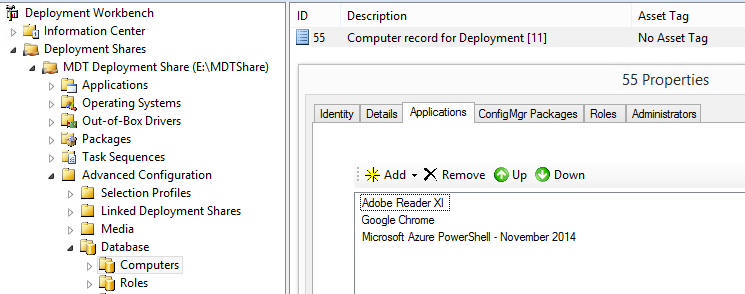
MDT 2013 is leveraged for the nifty things it does, most importantly as a database that can be queried by a task sequence client to get information about how to build itself, including its hostname and list of applications to install. This functionality is facilitated by several Orchestrator runbooks that create an MDT record with this information. Then the client comes along and receives the details from its usual queries during the remainder of the task sequence. You can view the records created by Orchestrator using the MDT Deployment Workbench under Database > Computers.
Everything described is out of box MDT functionality and can be configured using the provided features and tools. The necessary components are described in the implementation section below.
Configuration Manager 2012
Configuration Manager provides the operating system deployment capability and the task sequence (based on MDT additions) that is run on the client being deployed. As for MDT, nothing is special or customized here beyond the normal OSD setup, where you provide a task sequence to clients that boot either via PXE or boot media, where the task sequence performs the imaging of the OS and application installation from a Configuration Manager distribution point.
Aside from the task sequence itself, the only other item needed in Configuration Manager is a query that returns a list of applications. This query is then used by Orchestrator to sync the application list to SharePoint for selection in requests. The query is defined in the implementation steps below.
System Center Orchestrator 2012
Orchestrator interfaces between the components of the process. On an ongoing basis, it synchronizes the software list in SharePoint to provide current selections in the deployment request form. On a triggered basis, it acts on behalf of a deploying task sequence client to validate a request by ID, generate a unique hostname in the Active Directory domain, and create an MDT record to facilitate the deployment. It also accepts status updates from the client and records those in the request for viewing in SharePoint. Each of the runbooks is described in the Runbook Details section below.
Implementing In Your Environment
To test this in your lab, follow the yellow brick road here described.
Prerequisites
To get started, ensure the following are available:
-
Solution files downloaded using the link at the top of this page
-
Configuration Manager 2012 or above is installed with operating system deployment (OSD) configured, including a boot image and the OS image you want to deploy
-
SharePoint is installed. The example was tested against SharePoint 2010 Foundation, should also work with SharePoint 2013
-
Orchestrator service account granted at least Contribute permission on test site and lists
-
-
System Center Orchestrator 2012 R2 is available with the following integration packs installed:
-
System Center 2012 Configuration Manager
-
Microsoft SharePoint
-
Active Directory
-
Latest integration packs can be downloaded here
-
Orchestrator Configuration
First, we will import the runbooks and configure the environment.
Orchestrator Runbook Import
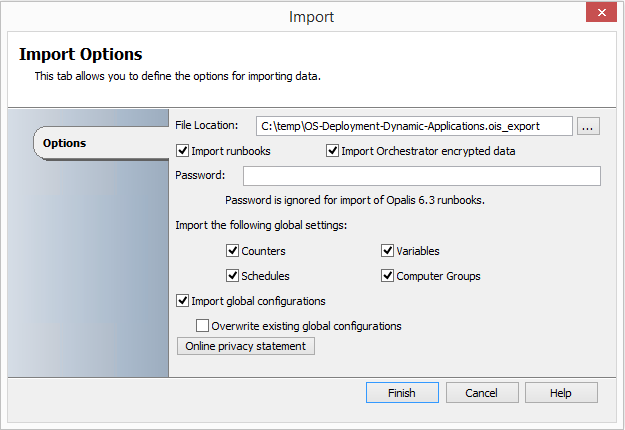
The download files contain an ois_export file that can be used to import all the runbooks in the example. Use the import feature in Runbook Designer to import the runbooks. Uncheck the option to “Overwrite existing global configurations”, and leave all other import options at default to ensure everything is created correctly. Note: ensure all prerequisite integration packs listed above are installed before importing. And, always back up your database before importing if you want a clean roll-back option.
Once the import process finishes, you should see the following in Runbook Designer:
-
Runbooks folder “OS Deployment with Dynamic Application Installation” with the example runbooks
-
Variables folder “OS Deployment with Dynamic Application Installation” in Global Settings > Variables > Automys Library with several variables.
-
Placeholder configuration under Options menu
-
Active Directory: “Automys TestingConfiguration – Active Directory”
-
Microsoft SharePoint: “Automys TestingConfiguration – SharePoint”
-
SC 2012 Configuration Manager: “Automys TestingConfiguration – ConfigMgr”
-
If you see runbook activities with a question mark icon, this means the required integration packs weren’t installed prior to import. You’ll want to delete what you imported or roll back the database, then install the integration packs before importing again.
Orchestrator Variable Configuration
Once the import finishes, several variables will be created under Global Settings > Variables > Automys Library > OS Deployment with Dynamic Application Installation. Update the values to reflect your environment. The purpose of each variable is explained in its description.

Orchestrator Integration Configuration
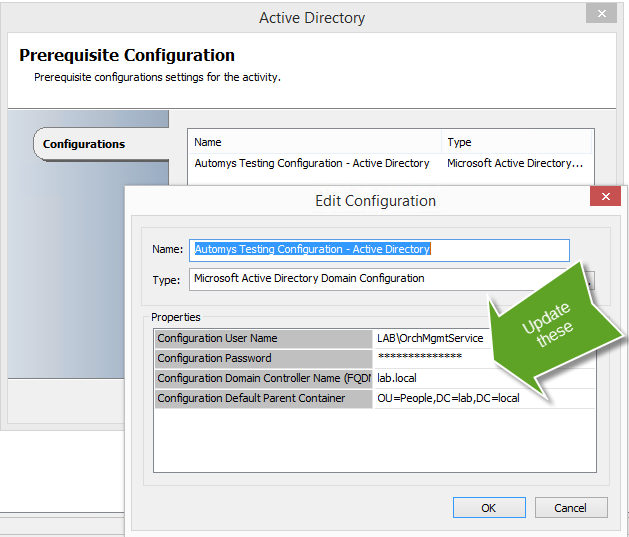
By default, the runbook import will bring in a global configuration for each of the integrations: Active Directory, SC 2012 Configuration Manager, and Microsoft SharePoint. To use these entries, update them with details for your environment. Alternatively, you can update each activity to use an existing configuration. The configurations are found in Runbook Designer under the Options menu.
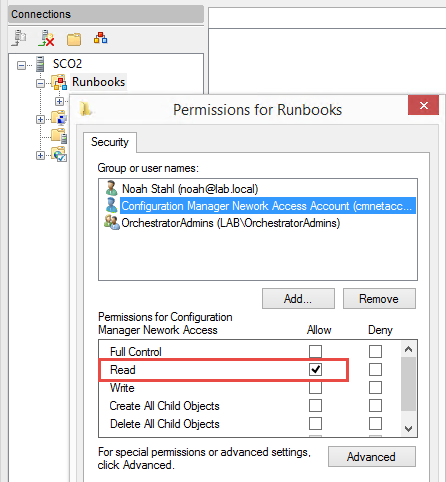
Runbook Permissions
Since the task sequence will be asking Orchestrator to execute runbooks, it will need to have permission to do so. This is accomplished by granting runbook permission to the Configuration Manager Network Access Account, which is used by the task sequence.
-
Obtain the username of your Network Access Account
-
Open Runbook Designer
-
Right-click on the Runbooks folder and select Permissions
-
Select the user and ensure it is granted only Read, since this is all that will be needed to execute the runbooks
MDT 2013 Installation
There are many installation guides for MDT available on the web via a quick search. Microsoft also provides downloadable documentation including a “Quick Start Guide for Microsoft System Center 2012 R2 Configuration Manager” that gives a procedure for installing MDT and integrating it with Configuration Manager. We won’t cover the details of the installation process here. For our purposes, note the following:
Deployment Share
A deployment share must be created, but without need for any additional configuration aside from the database under Advanced Configuration, which is covered next.
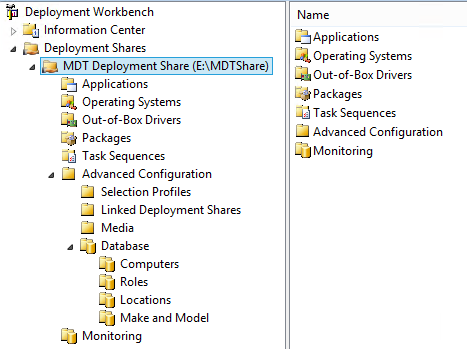
MDT Database
Under the Advanced Configuration of your MDT deployment share, you’ll need to have a database. When creating the database, define a SQL Share, which will allow integrated authentication from the task sequence in Windows PE. If you don’t configure the SQL Share, you’ll have to include a username and password in the CustomSettings.ini file in clear text to allow authentication to the database.
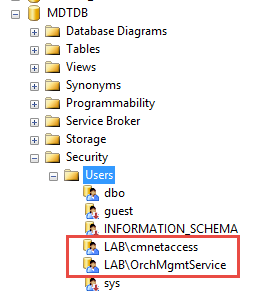
After the database is created, make sure it is accessible to both the task sequence clients and to Orchestrator. Required permissions are configured as follows under <database> \ Users \ (Properties) \ Membership:
-
Orchestrator runbook server service account: db_datareader, db_datawriter
-
Configuration Manager Network Access Account: db_datareader
MDT and Configuration Manager Integration
The MDT installation provides a “Configure ConfigMgr Integration” utility that integrates MDT into Configuration Manager. This allows using extra items in task sequences, like the ability to invoke Orchestrator runbooks. See for example this guide on the integration setup. If successful, you will see an option to “Create MDT Task Sequence” in the Configuration Manager console when viewing the task sequences section.
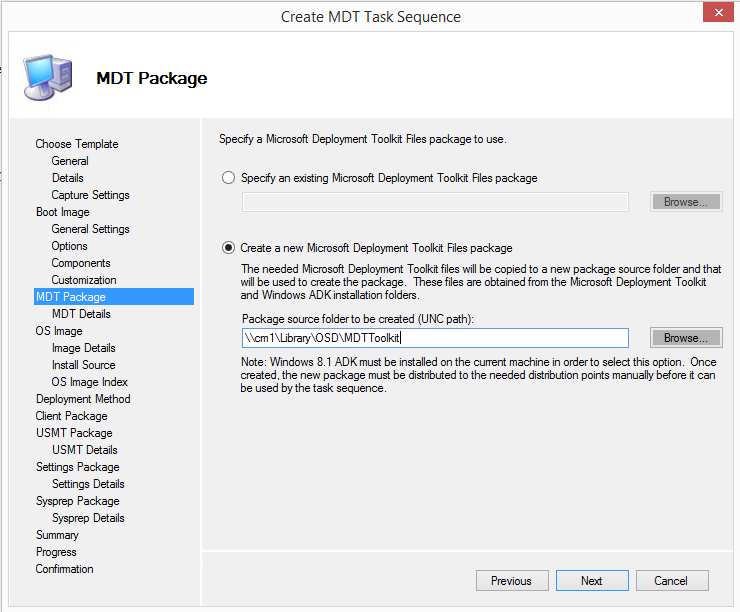
MDT Toolkit Package Creation
When the client runs MDT actions in a task sequence, it will need to make use of the MDT files. This is done through a package with the toolkit contents, which can be created most easily by using the Create MDT Task Sequence wizard. Use the step “MDT Package” to specify where to create a new package. Then, this package can be used in the example task sequence imported later. The task sequence created during this wizard isn’t intended for use and can be deleted after the wizard finishes. Ensure you run the Distribute Content wizard to distribute the package files to a distribution point.
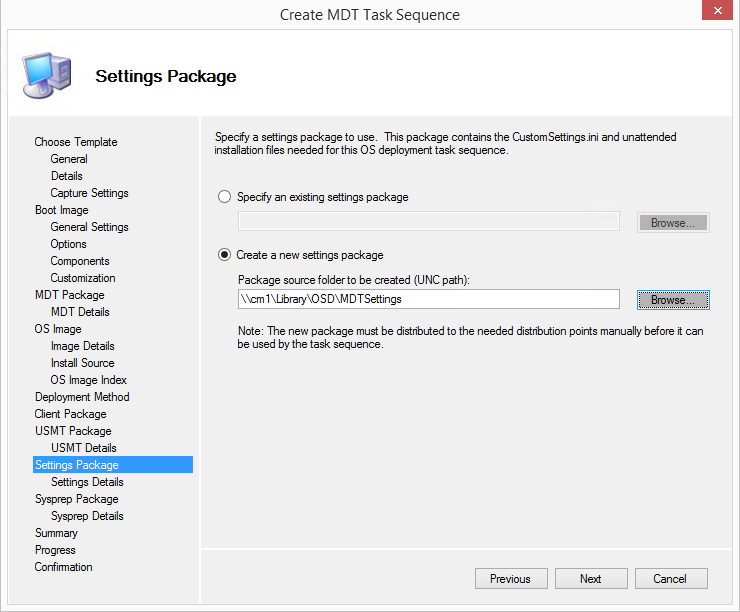
MDT Settings Package
The task sequence is able to query the MDT database using rules defined in the file CustomSettings.ini. This file must be included in a Configuration Manager package and referenced in the “Gather” task sequence steps. You can create this package in the same wizard shown above, within the “Settings Package” step. Once the package is created, ensure you run the Distribute Content wizard to copy the package files to a distribution point.
Deployment Log Share
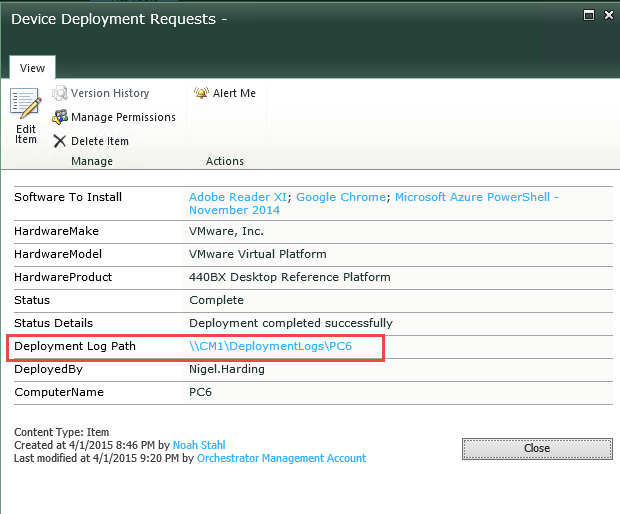
An MDT task sequence can copy all deployment logs to a shared folder upon completion or failure. This is a very nice feature for troubleshooting task sequence problems, and is highly recommended. You enable this by creating a share on the network accessible to the task sequence client running under the Configuration Manager Network Access Account credentials, allowing permissions to write to it, and setting the SLShare property in CustomSettings.ini. The path to the logs will be populated into the SharePoint request as a hyperlink, allowing one-click access to all the deployment logs including SMSTS.log and the MDT script logs.
Configuration Manager Setup
Configuration Manager should be set up to perform OS deployments (OSD). For the purposes of this example I’ll assume that you already have Configuration Manager OSD working, including a boot image and OS image. This example extends the existing capability. Assuming MDT and SCCM have been integrated as described above, we’ll need to import and configure the example task sequence, import or create the UI++ package, and create a query. These are described next.
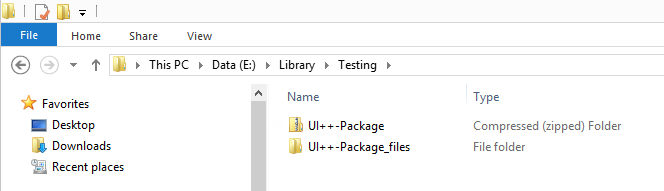
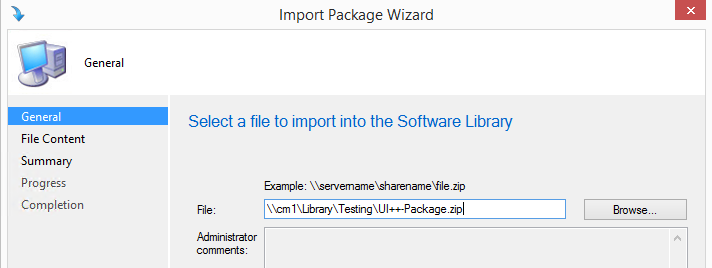
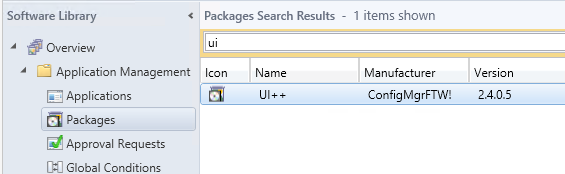
Import UI++ Package
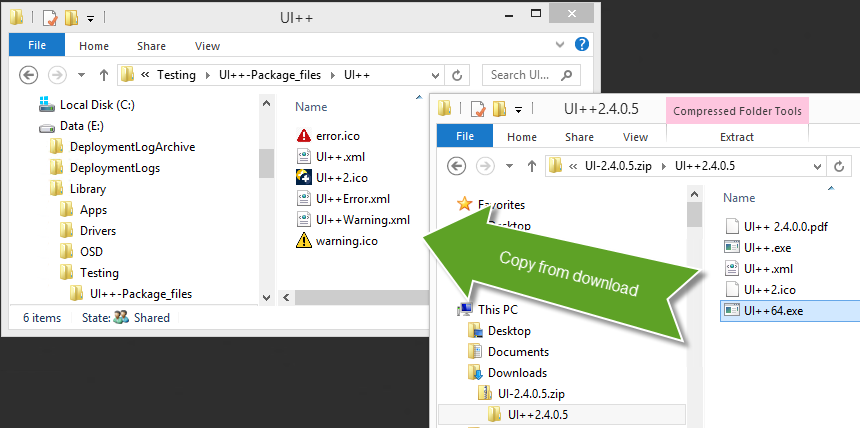
UI++ provides our user interface in the task sequence. This is delivered to the client as a package which includes several files including the UI++ executable and XML configuration files. These have been provided (with the exception of the UI++ executable) in the example download as the package export, which can be imported using the Configuration Manager console under Software Library > Application Management > Packages. To ensure you have the latest version, please download UI++ separately using the link in the steps below. Optionally, you can also create the package directly, using the included files as reference.
-
Copy the “UI++-Package.zip” file and “UI++-Package_files” from the solution download to a share folder where you store package source content for Configuration Manager
-
Import using the console, selecting the share path to the zip file. The file directory contents will be referenced by the new package.
-
Download the latest version of UI++
-
Copy the UI++64.exe file from the UI++ download into the package source share location
-
Run the Distribute Content and Update Distribution Points wizards to copy the content to a distribution point.
Task Sequence Setup
The solution download contains the task sequence used in the example. It can be imported in the same way as packages.
-
Copy the “Example-Task-Sequence-Exported.zip” file to a share folder where you store package content for Configuration Manager
-
In the console, open Software Library > Operating Systems > Task Sequences. Click Import Task Sequence.
-
Enter the share path to the zip file
-
Complete the wizard
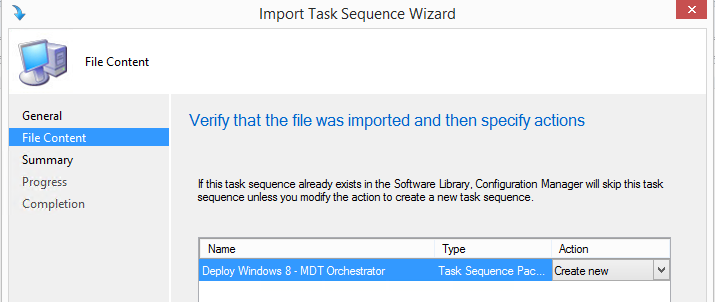
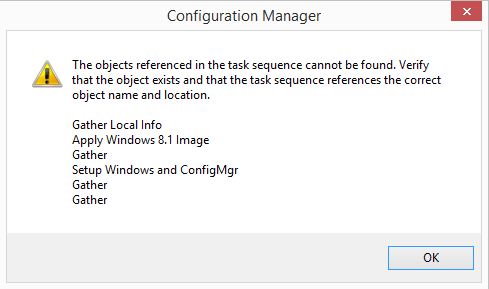
After completing the import, the task sequence should be listed. Now, it must be configured to fix any missing references to packages and credentials.
-
Right click on the task sequence and select Edit.
-
Confirm the warning if shown, which notes: “The objects referenced in the task sequence cannot be found. Verify that the object exists and that the task sequence references the correct object name and location.” This is expected.
-
For “Gather” steps, browse and select the MDT Settings package created above
-
For Install Image > “Apply Windows 8.1 Image” step, browse and specify an OS image package and optionally the package containing the unattend.xml file to be used. If unattend.xml is not used, uncheck the option “Use an unattended or Sysprep answer file for a custom installation”. An example unattend.xml file is included in the download.
-
For OS Setup > “Apply Windows Settings”, enter an administrator password if desired
-
For OS Setup > “Apply Network Settings”, configure the domain join if desired for your environment. Update the domain join account username and password.
-
For OS Setup > “Setup Windows and ConfigMgr”, select a ConfigMgr Client installation package.
-
Once all the errors have been resolved and everything is green, click Apply to save the updates.
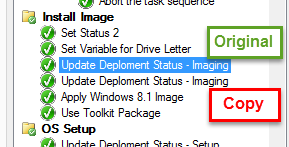
Configure “Execute Runbook” from Task Sequence
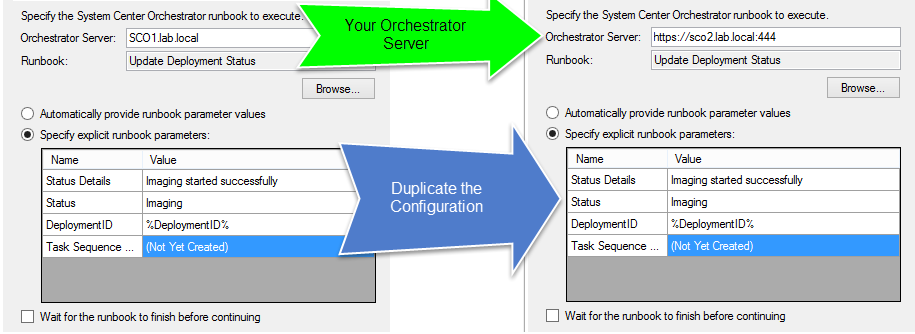
The task sequence client invokes Orchestrator runbooks using MDT > Execute Runbook task sequence steps. These must be configured to point to the Orchestrator server in your environment. Unfortunately, the act of updating your server address will cause the step’s configuration to be reset. The easiest way to make the updates while ensuring correct configuration is to make a copy of the step and then update the copy. Then, delete the original. To do this for a given Execute Runbook step:
-
Copy the Execute Runbook step (right-click copy or Ctrl-C)
-
Paste the step adjacent to the original (right-click paste or Ctrl-V)
-
Update the Orchestrator Server field to the address for your Orchestrator management server. If you configured your Orchestrator web service to use HTTPS, using the format “https://<Server>:<Port>”. Otherwise, you can simply use the server name or FQDN.
-
Once you specify the address for the Orchestrator server, you can browse to ensure the connection works. You should see the runbooks listed.
-
Select the runbook for the step you’re updating
-
Configure the parameters for the new step exactly as the original. You can copy and paste the values from the original.
-
When the two step configurations match, delete the original, leaving your new configuration.
Steps to update
You’ll need to perform the above for each of the execute runbook steps in the task sequence. These are:
-
Initialization > Request Deployment Validation
-
Install Image > Update Deployment Status – Imaging
-
OS Setup > Update Deployment Status - Setup
-
Software Deployment > Update Deployment Status – Installing Apps
-
Execute Task Sequence > Update Deployment Status - Complete
-
Gather Logs and StateStore on Failure > Update Deployment Status - Error
Deploy Task Sequence
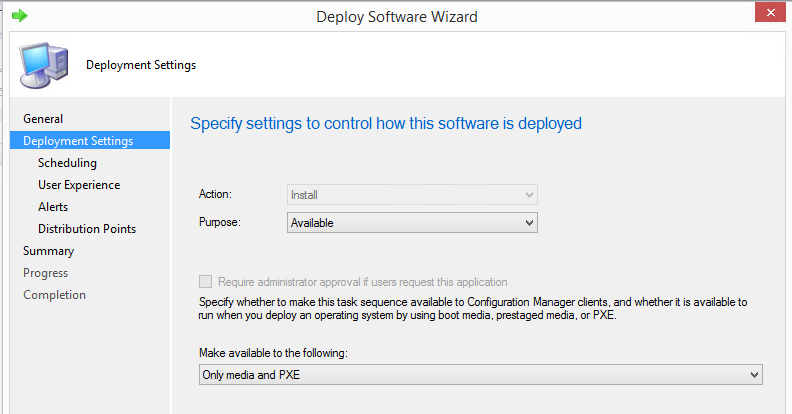
Finally, we need to deploy the task sequence to allow it to be run by clients. This can vary depending on your environment, but is the same as deploying any other OSD task sequence. For example, use the Deploy Software wizard to make the task sequence available to media and PXE clients. A deployment targeting the “All Systems” collection with all default selections should work for testing purposes.
Application Query Creation
Orchestrator performs synchronization of the applications in Configuration Manager to SharePoint by leveraging a query. We need to create that query. Here’s how:
-
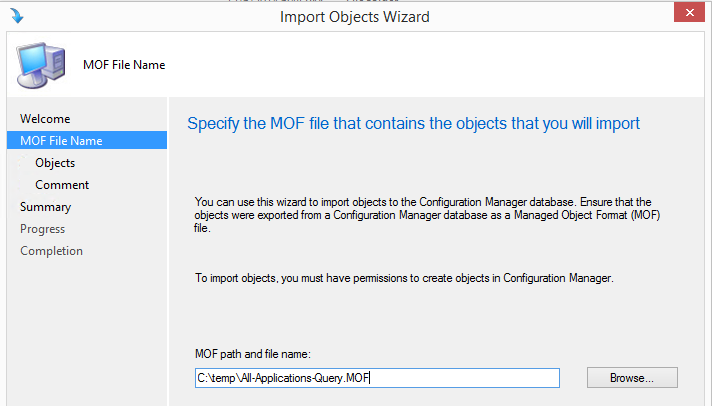
In ConfigMgr console, open Monitoring > Queries.
-
From ribbon, Import Objects
-
Browse to locate the file “All-Applications-Query.MOF” from the download files
-
Complete the wizard
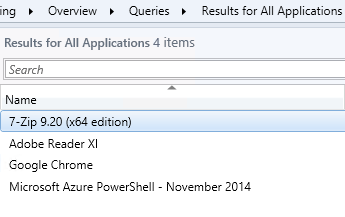
Once imported, you can test the query by selecting it and clicking Run from the ribbon. The result list of all application names should be displayed.
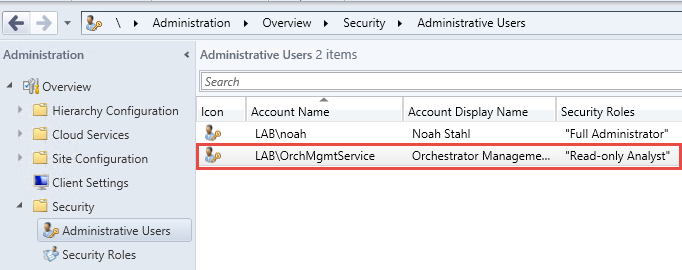
Orchestrator Administrative User
To run the query, Orchestrator will need to connect to Configuration Manager as a recognized user. In my testing, setting up the Orchestrator runbook server account as a Read Only Analyst works fine. Do this under Administration in the Configuration Manager console.
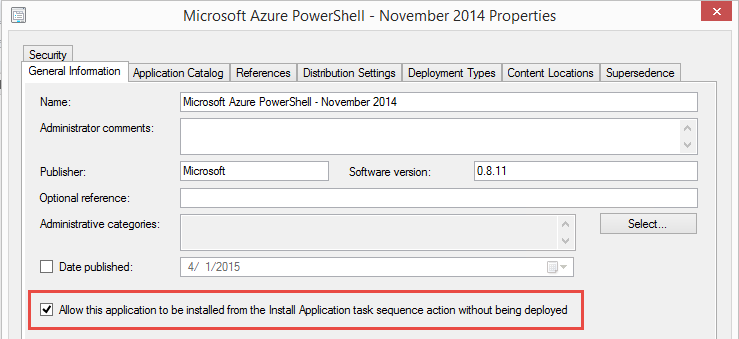
Application Configuration
Applications should be created using normal method in Configuration Manager 2012. For new and existing applications to dynamically deploy, make sure to enable the option “Allow this application to be installed from the Install Application task sequence action without being deployed”, otherwise you’ll see this error recorded in smsts.log during the task sequence execution:
SharePoint List Creation
Finally, we need to create our lists in SharePoint. There will be one for Software and another for Deployment Requests. These are provided in the download files as list templates (.stp files).
Follow these steps to use the template files to create the lists. Tested on SharePoint 2010. Perform for both files.
-
Open Site Actions > Site Settings.
-
Select List templates under the Galleries section.
-
Ensure the Documents tab of the Library Tools ribbon is visible.
-
Click Upload Document, and upload the .stp file included in the downloaded example files.
-
Once saved, open the All Site Content view.
-
Click Create, and select Device Deployment Requests Template or Software List Template.
-
Give the new list a name. Click Create.
-
The list is created. Verify a new item can be created and saved.
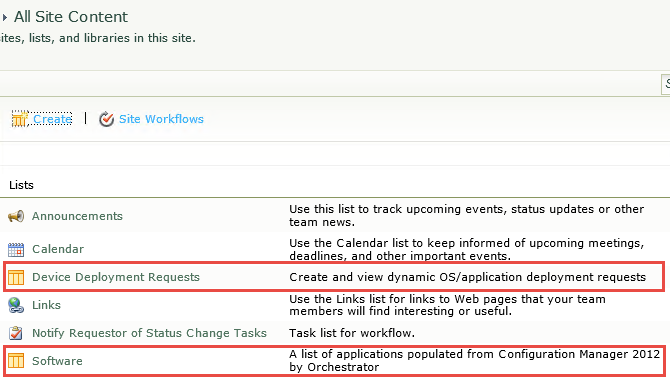
Upon import, the lists should be displayed in the site content:
OK, that should be all the setup. Now for the fun stuff.
Testing
With all that excitement out of the way, now we’re ready to test. The first thing we’ll do is populate our software list, then create a new deployment request, and finally kick off the deployment with the deployment ID.
Populating the Software List
To get the applications from Configuration Manager into SharePoint, start the runbook “Sync Application List” from Runbook Designer. This will run immediately and every hour afterwards. After a few moments, it should finish its first run and create the items in SharePoint. Check the list to see if this is true, and if not, inspect the runbook logs for more information.
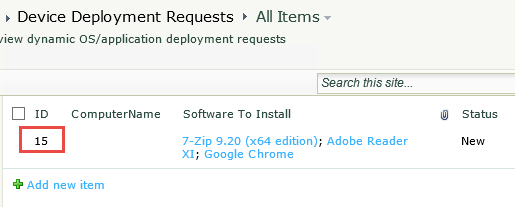
Creating a Deployment Request
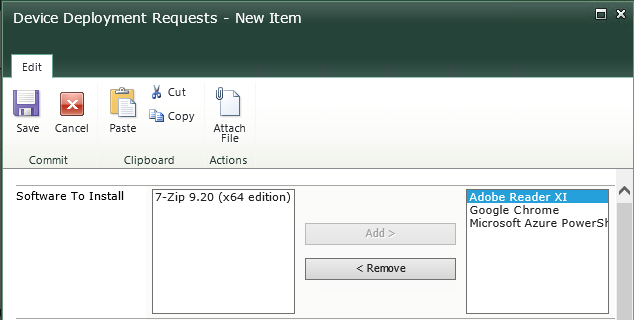
Assuming the applications are populated, we can now create a deployment request. Simply select Add new item in the Device Deployment Requests list. Then add one or more applications as Software to Install. Leave the remaining fields empty, and save. Note the ID of the resulting item.
Running a Deployment
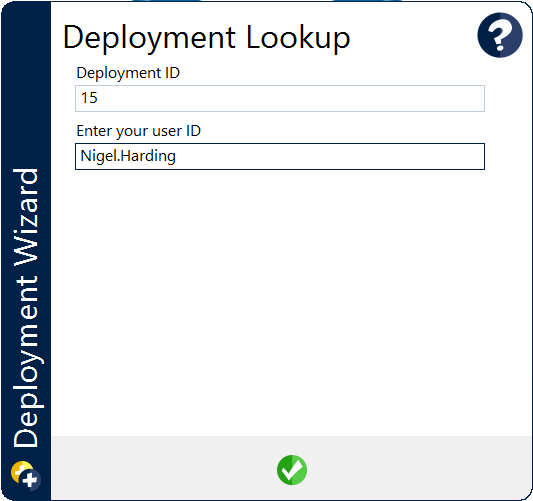
With deployment ID in hand, fire up the client device using boot media or PXE as normal (I recommend using a virtual machine for this to allow easy roll back to a snapshot before changes are made). If the task sequence deployment was correct, you should be able to select the example sequence “Deploy Windows 8 - MDT Orchestrator” from the list and continue. After some formatting and downloading package files, you should see the “Deployment Wizard” UI++ dialog appear, asking for ID and username. Fill these in and click the green button or press enter, and the deployment should proceed from there.

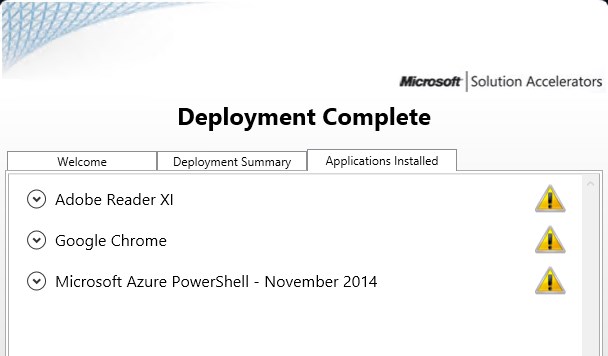
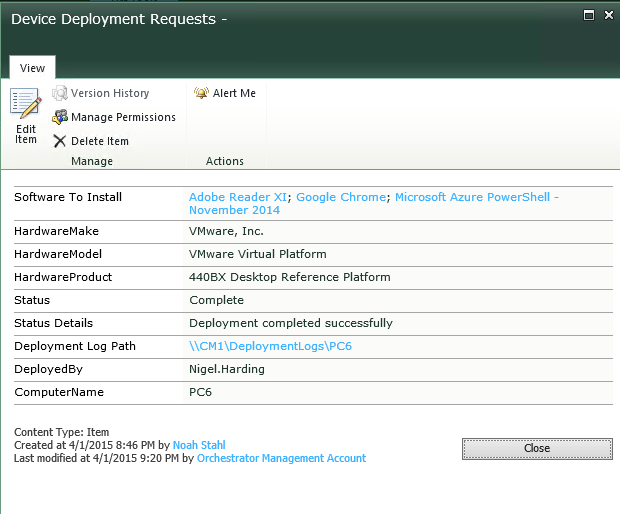
When deployment completes, close the summary and log in, checking whether everything looks right, including installed applications. If anything is missing, all logs for troubleshooting should have been copied to the “SLShare” defined in the CustomSettings.ini file if that was created. A link is populated in the original request:
Please let us know how you fare in the comments below. Enjoy!
Taking it Further
This is a fairly simple example considering all the other things that could be done by extending it. For example, one could also:
-
Deploy packages dynamically
-
Send notifications to the technician via email or text message when deployment completes or fails
-
Check to see whether a deployment for a given request is already in progress by somebody else, and prevent redundant deployments
-
Determine deployed software by group or role instead of a list
-
Get inventory data for a desktop refresh scenario to install the applications previously detected on the machine
-
Validate the generated hostname is not in use in other systems like Configuration Manager
-
Customize the machine for the user according to user account details
-
…and more
If you’re interested in help with a project like this or otherwise, we do that.