Self-Service VMware Deployment - System Center Service Manager and Orchestrator
Implement self-service VMware provisioning with System Center Service Manager as a user front-end and System Center Orchestrator as a deployment automation platform.
Solution Guide
What It Does
For many organizations, provisioning new servers is one of the most time-consuming and delaying activities for IT and the users they serve. It can take days or weeks to get a new machine created for development, testing, or production, when the actual work involved often takes only minutes or hours at most. Removing these delays is what the private cloud and DevOps is all about: giving IT and end-users quick access to new resources, with automation carrying the brunt of the workload.
This example shows how to implement self-service virtual machine provisioning for a VMware infrastructure using System Center Service Manager as a user front-end and service management platform, and System Center Orchestrator as a deployment automation platform.
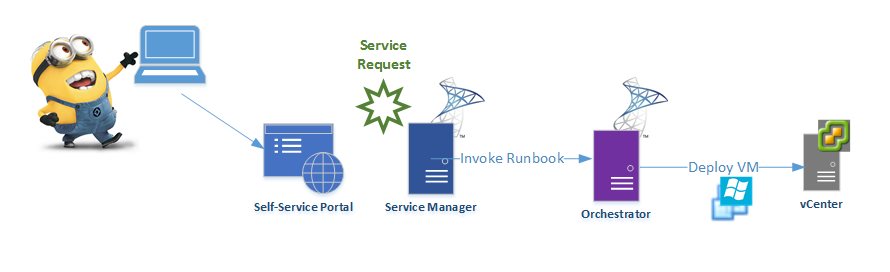
At a high level, VM deployment using this approach works as follows:
-
User (end user or IT) accesses a web-based (SharePoint) request form hosted in the System Center Service Manager Self-Service Portal
-
User fills in the requested parameters for a new VM, choosing items like the VMware datacenter, cluster, template, CPU and memory, etc. using selections populated by an automated discovery process
-
Upon submission, a service request is created that allows the user to track deployment progress
-
A series of runbooks in System Center Orchestrator are invoked that perform an immediate automated deployment of the new VM according to the requested parameters
-
The request is updated with the deployment results (success or failure) to provide status back to the user
Why Do This?
Using this approach you can achieve a streamlined, consistent and automated deployment of virtual machines that can be provided to end users or used internally to quickly provision new VMs by submitting a simple web-based request form.
We get several advantages:
-
Speed: Deliver a fully-configured virtual machine with operating system in well under an hour from time of request
-
Eliminate complexity of using tools like vSphere Client to provision VMs
-
Consistent, standardized provisioning by delivering through an automated workflow
-
Remove delays from the process: deployment can start immediately without waiting for a human operator to fulfill a request
-
Self-service: when appropriate, end users can submit a new VM request and get it fulfilled automatically without burdening IT with the work and without exposing back-end infrastructure management
-
Good service management: using a standard service request process allows capturing relevant historical information all in one place for later reference and analysis. See how many VM’s are being requested, by who, how long it takes to deliver them, etc.
The big picture: make the business faster and a better place to work.
How it Works
To get this working we integrate three key ingredients:
-
VMware vCenter (and managed infrastructure)
-
Microsoft System Center Service Manager 2012
-
Microsoft System Center Orchestrator 2012
For our purposes, this means a typical VMware infrastructure, with a vCenter server managing one or more clusters of ESX host servers grouped under one or more datacenters. In this infrastructure, you might normally go about creating a new virtual machine by choosing a datacenter, selecting a cluster and a host within that cluster, selecting a source template and a target datastore, and configuring a virtual network.
We also need a Service Manager 2012 instance, with a management server and the self-service portal components installed (no data warehouse is needed). Service Manager provides us the request form and holds the service requests, and also provides a Configuration Management Database (CMDB) to store VMware information that is automatically discovered and used to populate selections in the request form.
Finally we have the glue that holds it all together: System Center Orchestrator. Here we have runbooks that perform two responsibilities. First, a discovery runbook periodically captures the latest information from vCenter and populates it into Service Manager’s CMDB as configuration items for use when creating requests. On the other side, it is responsible for carrying out the automated deployment of a new VM according to a service request by orchestrating the actions in vCenter that bring the new VM to life in the desired configuration.
More details of each of these follows.
VMware vCenter
VMware’s vCenter is the management layer for the virtual infrastructure, and provides us a programmable interface through which we can tell it to do stuff, like create VMs and configure them as we please. VMware infrastructure is a large subject matter that we can’t cover in detail here – if you’re reading this, my assumption is that you probably work with one and therefore know the basics. We’re not doing anything incredibly fancy with it in this example (although you could), so it should be fairly easy to follow along.
The example was created with a vCenter version 5.1 environment, and should also work with more recent releases.
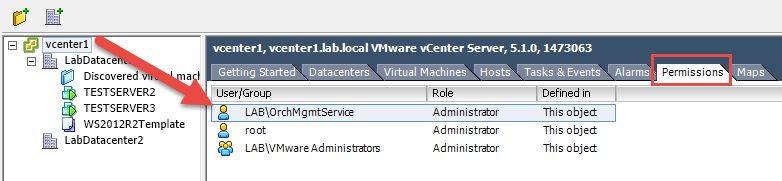
For the most part, nothing needs to change on the vCenter side for this integration to work. Primarily, we just need to have access from Orchestrator to perform both discovery and provisioning. That means an account must be defined in vCenter with permissions to the various resources that will be used or created during provisioning.
Permissions
For discovery, Orchestrator needs only to read these objects. During provisioning, it will need permission to do things like create virtual machines and configure them. This could be implemented as a specific set of permissions, but it’s easier to start in a test environment with the administrator role granted to the account, and then reduce the permissions after testing is complete and everything is working as desired.
System Center Service Manager
As mentioned, System Center Service Manager is being used in this example to give us a self-service portal and an ITIL-compliant service management platform including a CMDB. Those are a lot of fancy words, but the gist is simply this: we get a place to create a request, a place to keep it, and a place to store data to provide choices in forms. You could use other applications to perform these roles instead, including a variety of service desk systems like ServiceNow and Remedy, and even SharePoint. If you don’t use Service Manager, you can still use the overall approach covered by this example. Though not addressed here, you could also use the other features of such systems to enhance the functionality and management of the deployment process, like adding approval workflows, notifications, and metrics reporting.
Orchestrator Connector
One nice advantage of Service Manager is its System Center Orchestrator connector, which allows us to integrate easily between the two. Specifically, it allows us to invoke an Orchestrator runbook from a Service Manager service request. That means when a user creates a request, a runbook can be triggered directly to handle that request and perform whatever automated tasks are required. In this case, we have a series of runbooks that are triggered by the service request to perform an automated deployment of a new VM. Those runbooks are described later.
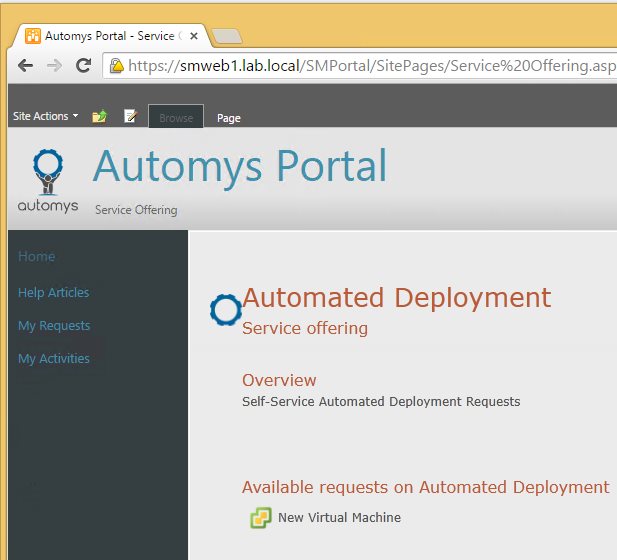
Request Form / Offering
The most visible part of Service Manager for us is the request form. We want to have a web form with which we can easily define our new VM, including where it should be deployed, from what template, and with what configuration. This means having pre-populated dropdown-style menus, since we don’t want the user to have to type in the name of a cluster or ESX host. Therefore, Service Manager needs to know about which VMware objects exist so it can provide those as choices in the form.
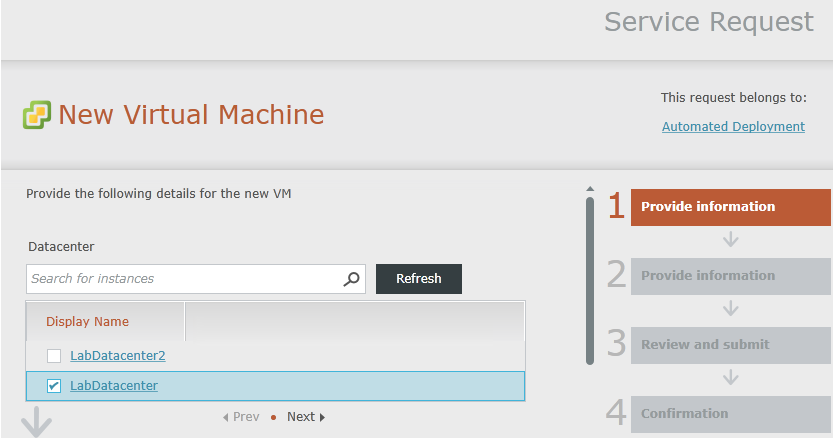
The request form is implemented in Service Manager as a Request Offering that falls within a Service Offering. In the example, the service offering (a grouping of similar requests) is called “Automated Deployment”, and the request offering is called “New Virtual Machine”. The request offering defines the form questions which the user completes before submitting. All of the VMware configuration item choices are implemented as Query Results prompts with filters to provide a cascading menu effect. That is, upon selecting a datacenter, the next choice for cluster is limited to only those in the selected datacenter, which in turn limits subsequent host selection to the cluster’s hosts, and so on. These filters can be reviewed in the Configure Prompts dialog within the Configure Criteria tab of the request offering definition.
Also included is the optional hostname prefix field, which allows the user to choose what the VM/computer name starts with, and get a unique name generated therefrom. For example, if they are not very creative and choose “SERVER” and many servers already exist with that prefix, the generated name may be SERVER117, for example. If the field is left empty, the implemented default is “VM”.
CMDB and Configuration Items
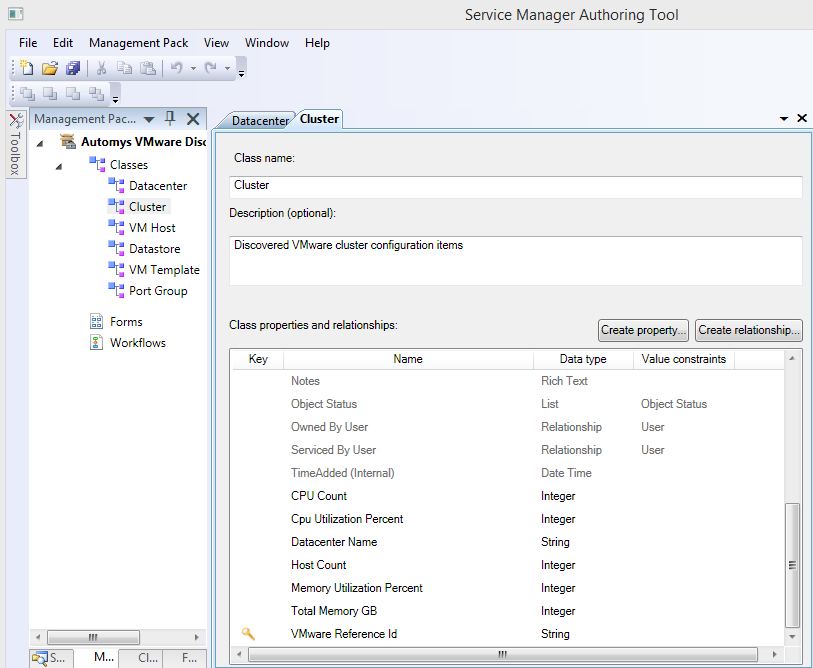
This is where the CMDB comes into play. As a CMDB, Service Manager stores configuration items, which are records of any object or entity in the environment worth keeping track of. In this case, we want to keep track of VMware items. To do this, we need to define those items as configuration item classes, then populate those classes with all the instances that exist. For example, VMware has clusters of hosts – so we need a “cluster” class and a “host” class, and need entries for every cluster and every host to which we want to be able to deploy a new VM. This would be extremely tedious to do by hand, but there’s automation for that, which we’ll discuss next.
The classes are defined using the Service Manager Authoring Tool. After creating each class with its various properties, the tool generates an XML management pack file for import into Service Manager. The example management pack has already been created and is provided in the download.
VMware Discovery
Discovery is the process of finding which objects exist and recording information about them. In our case, we need to discover all of the VMware items in the environment related to deployment requests, and then populate them into Service Manager as configuration item instances to appear as request form choices. For this example, we have defined the following VMware configuration item classes in Service Manager:
-
Datacenter
-
Cluster
-
Host
-
Datastore
-
VM Template
-
Port Group
Since there could be hundreds or thousands of such objects, this needs to be automated, which is implemented in an Orchestrator runbook containing a fancy PowerShell script in this example. The “Discover VMware Configuration Items” runbook runs periodically and does the following:
-
Connects to vCenter
-
Looks for objects of each type
-
Maps the properties of each vCenter-managed object to the properties of the configuration item class in Service Manager
-
Connects to Service Manager
-
Creates an associated configuration item instance in Service Manager. Or if it already exists, updates it with the latest property values.
This process is implemented using the Service Manager 2012 PowerShell module included with the management console installation, and the vSphere PowerCLI PowerShell module from VMware (both “free”). Therefore, these must be installed on the Orchestrator runbook server(s).
Once the discovery process completes, all your VMware items should appear in Service Manager, like magic.
System Center Orchestrator
While Service Manager is providing a (relatively) pretty face for deployment, Orchestrator is doing all the work. More specifically, the example runbooks handle the following tasks:
-
Discovery of vCenter (just discussed)
-
Receiving the service request and translating it into deployment actions
-
Generating unique hostname / VM name
-
Creating and configuring the VM
-
Recording any errors and updating the service request with deployment results and status
The example runbooks are relatively simple, but they show how you can save a lot of time and improve consistency with a standardized implementation. They provide an example of how to use the VMware vSphere integration pack to connect to vCenter and perform built-in activities like Clone VM, Reconfigure VM, and Customize VM. They also show how to leverage VMware’s PowerCLI PowerShell module to do more advanced things that aren’t available or straightforward when using the integration pack activities. For most implementations, some PowerShell will like come into play, because it can do pretty much anything vCenter provides, whereas the integration pack provides a relatively limited subset.
For more details on what each runbook and activity does, see the descriptions for each below, and explore the activities in the runbook viewer above.
Implementing In Your Environment
This section covers how to get this example working in your test environment, including the prerequisite configuration and files to import.
Prerequisites
First things first. There are several components that should be in place before you start:
-
VMware environment
-
vCenter Server, version 5.1 or above (both Linux appliance and Windows installation should work)
-
At minimum, there should be enough infrastructure to create a new Windows virtual machine: a datacenter, cluster, host, datastore, Windows Server template, and port group (using distributed vSwitch)
-
-
System Center Service Manager 2012
-
2012 R2 release with latest update rollup recommended. Management pack import may fail into 2012 SP1 system. If so, please let us know.
-
Self-Service Portal installed. Note the requirement for Windows Server 2008 R2
-
-
System Center Orchestrator 2012 R2, with following integration packs installed
-
Active Directory
-
SC 2012 Service Manager
-
VMware vSphere
-
-
Service Manager Console installed on the Orchestrator runbook server(s) (installed from installation media)
-
VMware vSphere PowerCLI PowerShell module installed on the Orchestrator runbook server(s) (download here)
-
Solution files package downloaded from the top of this page
Import the Orchestrator Runbooks
Note: you may want to back up your Orchestrator database before making changes (in addition to your normal scheduled backups). That makes it easy to roll back any changes.
Use the standard import functionality in Runbook Designer:
-
Select a runbooks folder where you want the imported folder to go
-
Right-click and choose Import
-
Browse to the “<filename>.ois_export” file extracted from the downloaded zip file
-
Click Finish (leave default options selected)
Once the import process finishes, you should see the following in Runbook Designer:
-
Runbooks folder “VMware Deployment – Service Manager” with the example runbooks
-
Variables folder “VMware Deployment – Service Manager” in Global Settings > Variables > Automys Library with several variables.
-
Placeholder configuration under Options menu
-
Active Directory: “Automys TestingConfiguration – Active Directory”
-
VMware vSphere: “Automys Testing Configuration – vSphere”
-
SC 2012 Service Manager: “Automys Testing Configuration - Service Manager”
-
If you see runbook activities with a question mark icon, this means the required integration packs weren’t installed prior to import. You’ll want to delete what you imported or roll back the database, then install the integration packs before importing again.
Configure Active Directory Integration
In the Runbook Designer Options > Active Directory menu, update the entry “Automys Testing Configuration – Active Directory” to reflect your environment. This is used in the “Generate Unique Hostname” runbook to query for existing computer names in the domain.
Configure VMware vSphere Integration
In the Runbook Designer Options > VMware vSphere menu, update the entry “Automys Testing Configuration – vSphere” to reflect your environment. I recommend using the same service account that is used for the Orchestrator runbook server here. Within the vSphere Client or other management tool, ensure this account is granted permissions to the resources that will be discovered and created. It’s a good idea to test logging into vSphere Client as this account to make sure access is granted correctly.
Configure Service Manager Integration
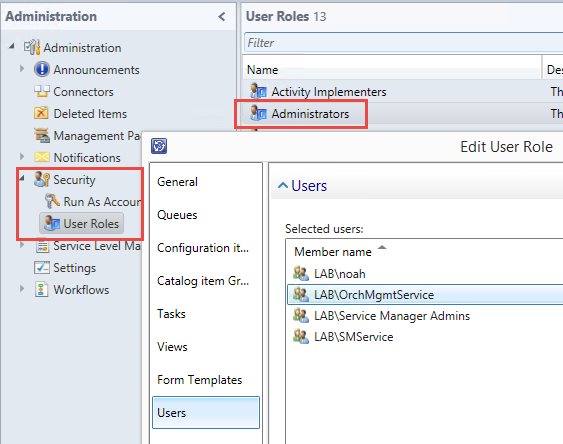
In the Runbook Designer Options > SC 2012 Service Manager menu, update the entry “Automys Testing Configuration – Service Manager” to reflect your environment. I recommend using the same service account that is used for the Orchestrator runbook server here. For this example, use the same account for both vCenter and Service Manager access. This account should be configured with access to Service Manager through the console by granting it membership to a User Role under Administration > Security. For testing purposes I used the built-in Administrators role, which gives full rights to read and write objects.
Configure the Orchestrator Variables
Update the values for the imported variables in the “Automys Library > VMware Deployment – Service Manager” folder to match your environment. Each variable has a description about what value is needed. Simply open the variable and replace the value. Note the Orchestrator Service Account user and password, which should match the account you configured above.
Configure vCenter
Aside from granting permission to the account Orchestrator uses to access vCenter, the only other item needed is an OS Customization Spec, which will be used in the deployment runbook to configure the new VM. The example runbook uses the same spec for all deployments, which is configured by specifying its name in the variable “Default VMware OS Customization Spec”.

Synchronize Orchestrator Runbooks
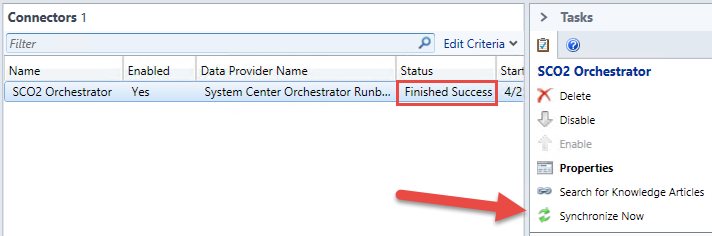
The new runbooks will need to be synched over to the Service Manager library using the Orchestrator connector. If no Orchestrator connector has been configured, you can set that up from Administration > Connectors in the console as described here.
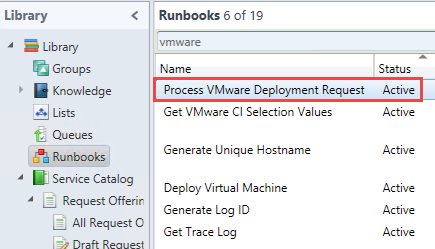
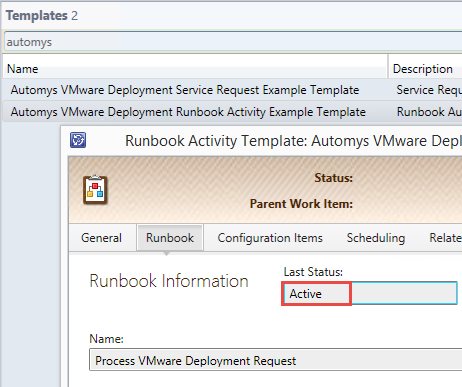
Select the connector and click Synchronize Now from the task pane. Once the status indicates “Finished Success”, check Library > Runbooks to see that the new runbooks appear with Active status, in particular the runbook “Process VMware Deployment Request”.
Import Management Packs
Having fun yet? The next step is to import the management packs into Service Manager. These include the Configuration Item classes for VMware and example request/service offerings and templates. They also include references to the Orchestrator runbook that is invoked when a request is submitted for a new virtual machine.
Because the runbooks are referenced by ID and those IDs change when you import runbooks into a new Orchestrator instance, the references will be broken if you use the normal management pack import action through the console. To work around this, I’ve provided a PowerShell import script that fixes the references dynamically while performing the import.
To import using the script:
-
Log on to your Service Manager management server
-
Copy the extracted solution files folder from the download to any temporary location on the management server.
-
Ensure your PowerShell execution policy allows running scripts
-
Check that the script file Import-AutomysExampleManagementPacks.ps1 is unblocked
-
Run the script Import-AutomysExampleManagementPacks.ps1 from a PowerShell prompt or by right-clicking in Windows Explorer and choosing Run with PowerShell
-
Confirm the import when prompted


Validate Import
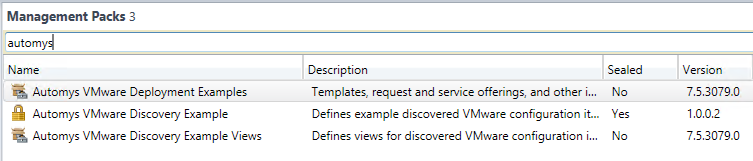
When the management pack import is complete, you should be able to open the Service Manager Console and see some new things there:
-
Three new management packs: Automys VMware Discovery Example (with associated) Views, and Automys VMware Deployment Example
-
A new Configuration Items folder called Automys Library Examples
-
A new request and service offering for a New Virtual Machine
-
Two new templates for runbook activity and service request
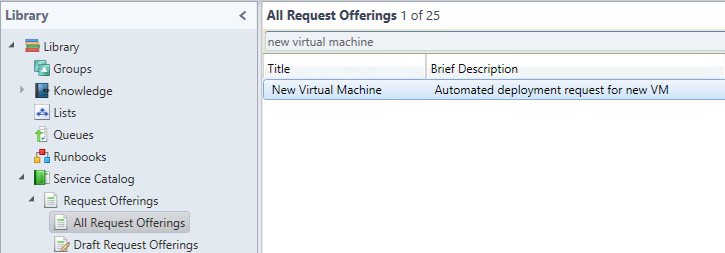
Check that the new service offering “Automated Deployment” includes the request offering “New Virtual Machine”. Sometimes this association is lost during import.
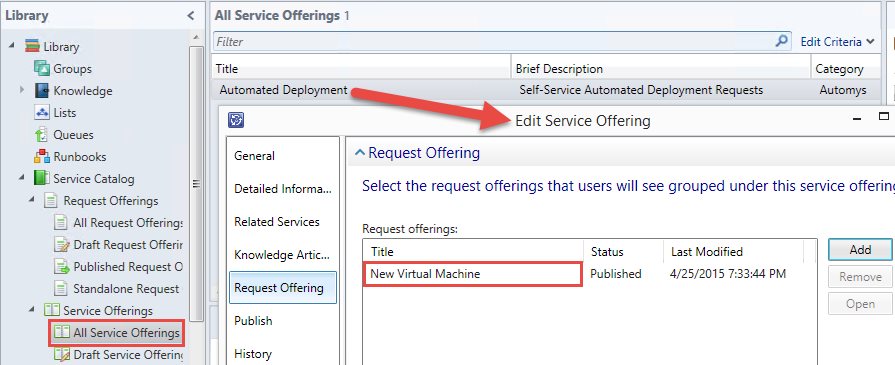
Also ensure that the templates are correctly referencing the Orchestrator runbook. To verify, open each of the new templates from the Library workspace check that the runbook tab shows a status of “Active”. If it shows a warning or is blank, the references weren’t fixed upon import or the runbook hasn’t been synchronized yet by the Orchestrator connector.
Testing
See, that wasn’t so bad was it? Time to give it a whirl. First times are either awesome or really awkward, so here’s hoping for the former.
Run VMware Discovery
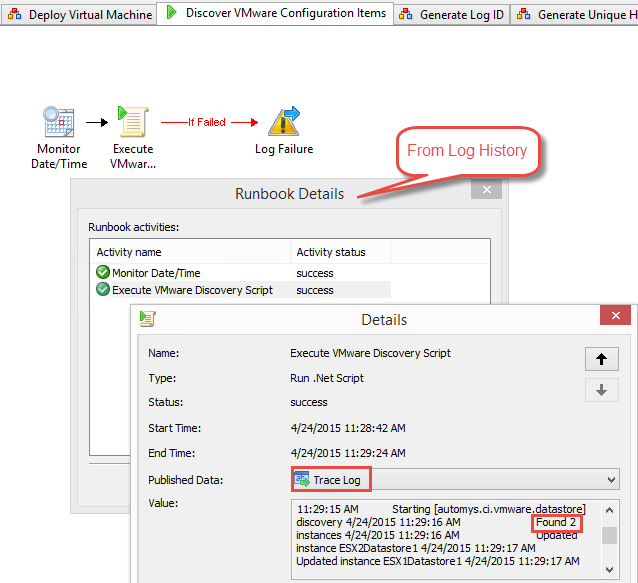
The first thing to do is start the discovery runbook that will populate the VMware configuration items into Service Manager. From Runbook Designer, start the runbook Discover VMware Configuration Items. The discovery script should be run immediately, with run time varying depending on the number of objects in VMware. For small environments, it should finish within a minute or two. Keep an eye on the Log History for the runbook to see the results.
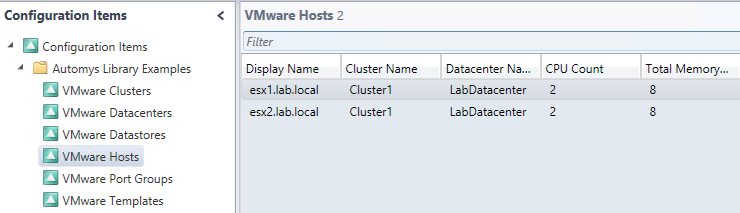
For a successful run, the Trace Log published data should show each item being discovered. Copy the contents to WordPad for easier viewing. You should also see the new entries in the Service Manager Console under Configuration Items.
Submit a New VM Request
With the configuration items populated, everything is set up for a new request. Create one as follows:
-
Open the Service Manager Self-Service Portal in a browser
-
You should see a category called “Automys” with a service offering called “Automated Deployment”. Open it up.
-
Open the request type “New Virtual Machine”.
-
Click the Go to request form button.
-
Make the selections to complete the request. When selecting from a multi-select field, make a selection and click Refresh on the next question to reveal the next set of choices.
-
On the review page, click Submit.
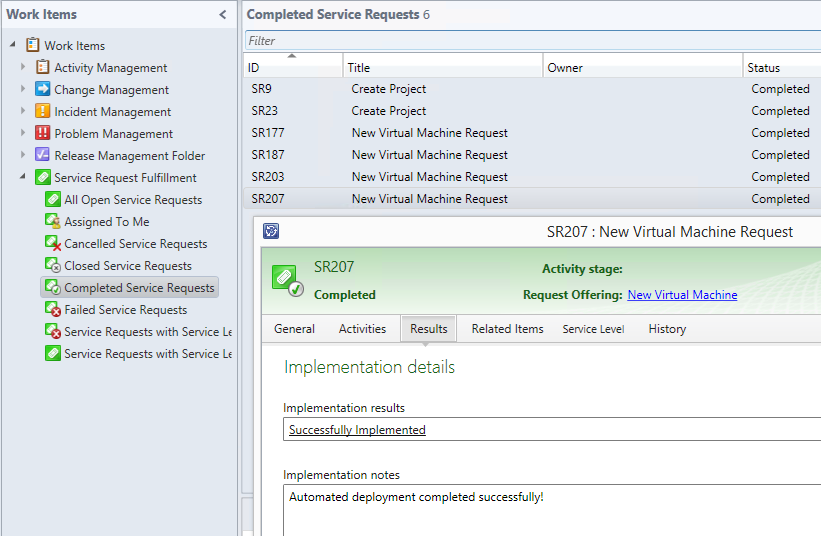
Upon submission, a new service request should be created and enter the In Progress state. Within 15-30 seconds, the runbook Process VMware Deployment Request should be started by Service Manager, and the deployment should begin. Watch the Log History for each runbook to see how things are working and catch any problems. In vCenter, a task for cloning a new VM should appear soon thereafter. The service request status and results should be updated upon either completion or failure, as seen under Work Items > Service Request Fulfillment.
Taking It Further
This is a basic example that provides a good starting point to extend in your environment. There are many ways to customize and optimize the process. Some ideas:
-
Add support for multiple vCenter servers (this example supports one for simplicity)
-
Do automatic placement instead of requiring user to choose a cluster/host
-
Add an approval workflow to provide a way for new VM requests to be signed off before deployment
-
Support standard VM configurations for sizes or application workloads like databases, application servers, domain controllers, etc.
-
Send email or text message notifications when deployment is complete
-
Extend VMware discovery to include more item types or properties
-
Configure the operating system and install applications after the VM is deployed
-
…many more
Hopefully this helps get you started. If you have any questions or are interested in help extending this example, we’d love to hear from you.