Send SMS / MMS Text and Voice Messages from System Center Orchestrator
Use System Center Orchestrator, PowerShell and Twilio to send texts or initiate phone calls from any runbook without a modem or email aliases.
Solution Guide
What It Does
These example runbooks allow System Center Orchestrator notifications to be sent via SMS text or MMS messages or voice phone calls by integrating with the internet-based Twilio messaging service (no modem or mobile service required). It can send provided message content either as text in an SMS or MMS message, or machine-read as speech in a voice call. The runbooks show how to send using a known phone number or a username lookup in Active Directory, and could be used from any existing runbook in your environment that needs to send a notification using text or voice.
Note: Video tutorials above do not show the MMS capability, which was added in subsequent update
Usage Scenario
Orchestrator provides the Send Email activity out of the box to deliver messages over SMTP. Sometimes additional methods of communication may be helpful, e.g. having critical alerts trigger a phone call to operations staff after-hours to maximize the chance of notification being delivered (who doesn’t like being woken up at 3 AM?). Or, you might want to send an SMS text reminder like “Don’t forget to bring your required documents” to a new employee two hours before they’re scheduled to start on their first day. This runbook can provide a supplement to email notifications by providing automated SMS text messages and voice phone calls as alternative communication channels.
This method provides arguably the least expensive means to implement SMS/MMS and voice integration (without maintaining mobile carrier aliases for every recipient). It requires only an Internet connection and a Twilio account, which can be operated in trial mode for free, or for very low cost with a full-featured account (less than $0.01 per message). If you don’t require the robust features of third party enterprise notification services like those from Derdack (see their video demo), this is a simple and cheap option.
How it Works
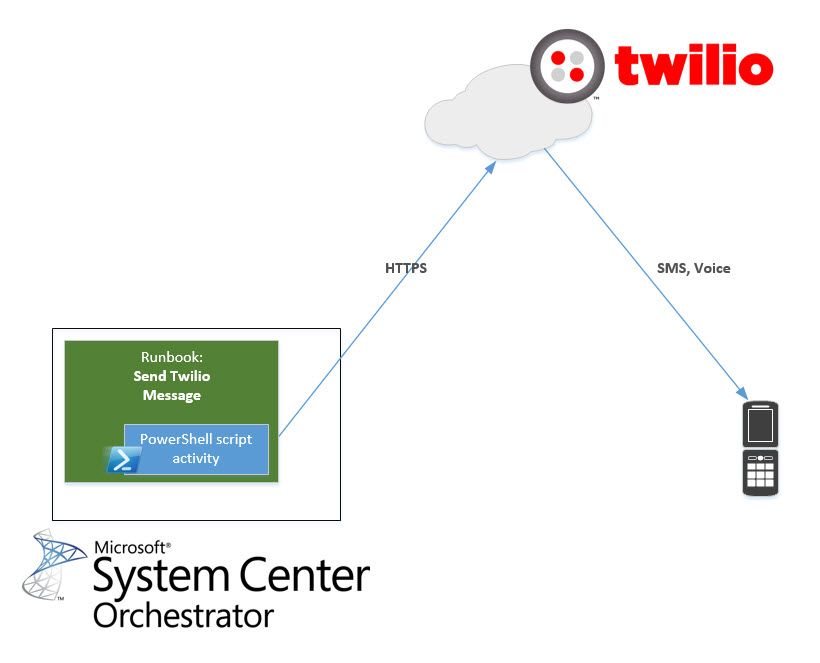
The core runbook, “Send Twilio Message”, executes a PowerShell script that integrates with the Twilio service API to send the provided message to one or more recipients. It can be invoked from any runbook that needs to send such a message. Simply provide the message content, type and recipient phone number(s), and the runbook completes the message delivery in a few seconds. The below sections explain additional aspects.
Twilio Integration
Twilio provides the message delivery. The runbook’s PowerShell script uses the Twilio API to connect to the service via HTTP and requests delivery of the message to a given recipient. Therefore, a Twilio account must be available and configured for the script to use. Note that this means an Internet connection is required for message delivery.
Delivery Methods
Messages can be delivered by SMS text message or voice phone call. The method is determined by the “Message Type” parameter used when invoking the runbook (“SMS”, "MMS" or “Voice”). Messages are truncated to fit within the SMS 160 character limit. For voice calls, the message text is read aloud by an awkwardly charming robot voice.
MMS vs SMS Message Types
You can choose between SMS and MMS when sending text messages. There are advantages and disadvantages of each:
SMS (text messages)
- Less expensive (see Twilio rates)
- Delivery available in most countries
- Limited to 160 characters per message
MMS ("picture messages")
- More expensive
- Delivery limited by Twilio to certain countries
- Allows 1600 characters to provide more text in a single message
- Allows sending images (optional) by supplying a public URL to the image as the "MMS Image URL" runbook parameter
Configuration
The runbook references several configuration values stored in Orchestrator’s global configuration as variables. These variables define the Twilio account credentials and API files directory. Because the account credentials can be used to manipulate the account (whether accidentally or maliciously), it is recommended to enable the encryption option for the “Auth Token” variable and use Orchestrator best practices to limit access to trusted administrators.
Implementing In Your Environment
This section describes how to get the runbook working. A step-by-step installation video is also available.
Prerequisites
We’ll assume the following is in place before getting started:
- System Center Orchestrator 2012 or above installed
- System Center Integration Pack for Active Directory (if sending messages by username)
- Latest integration packs can be downloaded here
- PowerShell 3.0 or above installed on Orchestrator runbook server(s)
- Solution files downloaded from this page on Automys.com
- You have sufficient enthusiasm and attention span to last at least 5 minutes but not necessarily longer than 20
Twilio Setup
First you’ll want to set up a Twilio account. We won’t go into all of the details of this awesome service here, as there is plenty of information on the web about that. For now, getting a free trial account created is sufficient.
- Go to Twilio.com and follow the signup process. You’ll choose a phone number here.
- When signup is done, you should find yourself on the getting started page. Here, locate your Twilio number and the API credentials for the account.
- Trial accounts can only contact phone numbers that are pre-verified in your account. To add numbers you want to call or text while testing, add them under Numbers > Verified Caller IDs.
That’s it. Leave the page up to grab the account info in a later step.
Files Setup
Next, you’ll set up the API files directory. This is just a folder on the runbook server(s) with two DLL files needed by the runbook script. Create an equivalent folder on all runbook servers.
- Unzip the downloaded solution files into a directory of your choice that is accessible to the Orchestrator service account. For example: C:\OrchestratorFiles\Twilio
- Ensure the API library files are present: Twilio.Api.dll and RestSharp.dll.
- Optional: if wanting to obtain the above files independently for security or to use the latest version, perform the following steps to download. A zip utility like 7-zip may need to be installed. For a demo of this step, see the installation video for this related example.
- Open https://www.nuget.org/api/v2/package/Twilio in a browser. This should trigger the download of a “nupkg” file, which is a Nuget package for the .Net Twilio API.
- Open the file with your zip utility and locate Twilio.Api.dll within lib\3.5. Copy this to the script folder configured above.
- Open https://www.nuget.org/api/v2/package/RestSharp in a browser. This should trigger the download of a “nupkg” file, which is a Nuget package for the .Net REST API.
- Open the file with your zip utility and locate RestSharp.dll within lib\net4. Copy this to the script folder configured above.
Importing the Runbooks
Note: you may want to back up your Orchestrator database before making changes (in addition to your normal scheduled backups). That makes it easy to roll back any changes.
Use the standard import functionality in Runbook Designer:
- Select a runbooks folder where you want the imported folder to go
- Right-click and choose Import
- Browse to the “<filename>.ois_export” file extracted from the downloaded zip file
- Click Finish (leave default options selected)
Once the import process finishes, you should see the following in Runbook Designer:
- Runbooks folder “Twilio Messaging” with the example runbooks
- Variables folder “Twilio Messaging” in Global Settings > Variables > Automys Library with several variables.
- Placeholder configuration under Options menu
- Active Directory: “Automys Testing Configuration – Active Directory”
If you see runbook activities with a question mark icon, this means the required integration packs weren’t installed prior to import. You’ll want to delete what you imported or roll back the database, then install the integration packs before importing again.
Configuring the Variables
Update the values for the imported variables to match your environment. Each variable has a description about what value is needed. Simply open the variable and replace the value.
The Account SID, Auth Token, and Sender Phone Number values come from your Twilio account on the Get Started page.
Configuring Active Directory Integration
In the Runbook Designer Options > Active Directory menu, update the entry “Automys Testing Configuration – Active Directory” to reflect your environment. Note: this step not required if you aren’t using the runbook to send a message based on a username.
|
Property |
Value |
|
Configuration User Name |
Used to connect to domain controller. Recommend using the Orchestrator service account, e.g. DOMAIN\Username. |
|
Configuration Password |
Password for account |
|
Configuration Domain Controller Name (FQDN) |
Use simply the domain name unless not all domain controllers are reachable on the network, which would be bad |
|
Configuration Default Parent Container |
The base OU where searching should start. Can simply be DC=<yourdomain>,DC=<com> if you don’t have a more specific part of the directory where users and groups are located |
Kicking the Tires
The moment of triumph is near. Several testing runbooks are provided that make it easy to run some tests. They each have the name prefix “Test – “:
- Test - Send SMS Text Message
- Test - Send MMS Message
- Test - Initiate Voice Call
- Test - Send SMS Text Message By Username
To run one of the tests, just update the parameter values in the test runbook and execute:
- Check out the test runbook
- Double-click to open the “Invoke…” activity
- Update the existing example parameter values with your own
- Click Finish
- Check in the runbook
- Click Run
If the stars align, the recipient you entered should soon receive a message on their phone.
Troubleshooting
If no message is received, it’s more likely due to user error than astrology, but don’t feel bad. There are ample logs to hopefully show what went wrong. The places to check:
- Events log in Orchestrator. View from Events tab, usually below the runbook canvas.
- Log History for each runbook. View from Log History tab when selecting a given runbook. Double click an entry to view results of each activity, and double click activity entries to see data about each one.
- The following details are most important on the “Execute Messaging Script” activity in the “Send Twilio Message” runbook:
- Result Status – “Success” or “Failed” overall result of script
- Error Message – content of any script errors that occurred. Blank if all went well.
- Trace Log – Detailed chronology of script actions and results. Best viewed by copying the entire contents and pasting into WordPad.
If you’re still stumped, feel free to ask questions in the comments below or contact us.
Readying for Production
After testing demonstrates everything is working, remember a couple considerations before going live.
First, consider disabling the “Store activity-specific published data” logging option on each runbook. This can cause needless database growth when data isn’t needed for audit or troubleshooting purposes.
Second, it is probably not advisable to use Twilio trial account past the testing phase. It’s cheap and they provide an excellent service, so pony up.
As always, please reach out if you found this helpful, have questions, or are looking for something even fancier.